Table of contents
- Step 1: Setting a Static Internal IP
- Step 2: Tackling the External IP Problem
- Building My Own Dynamic DNS Management
- Step 3: Securing SSH Access
- Step 4: Setting Up a Firewall
- Step 5: Hosting Self-Hosted Apps
- Step 6: Media and Photo Storage
- Homelab Setup Part 2: The Jump Host Solution
- Homelab Part 3: Automating the Dynamic IP Problem—The Hard Way
- The Plan: A Fully Automated System
- Step 1: Assigning Domains to Connecting Machines
- Step 2: The Home Node Program
- Step 3: The Connecting Nodes Program
- The Closed Loop: How It All Works Together
- Homelab Part 4: Adding a Monitoring Layer with the ELK Stack
- The Problem: Scattered Logs and Metrics
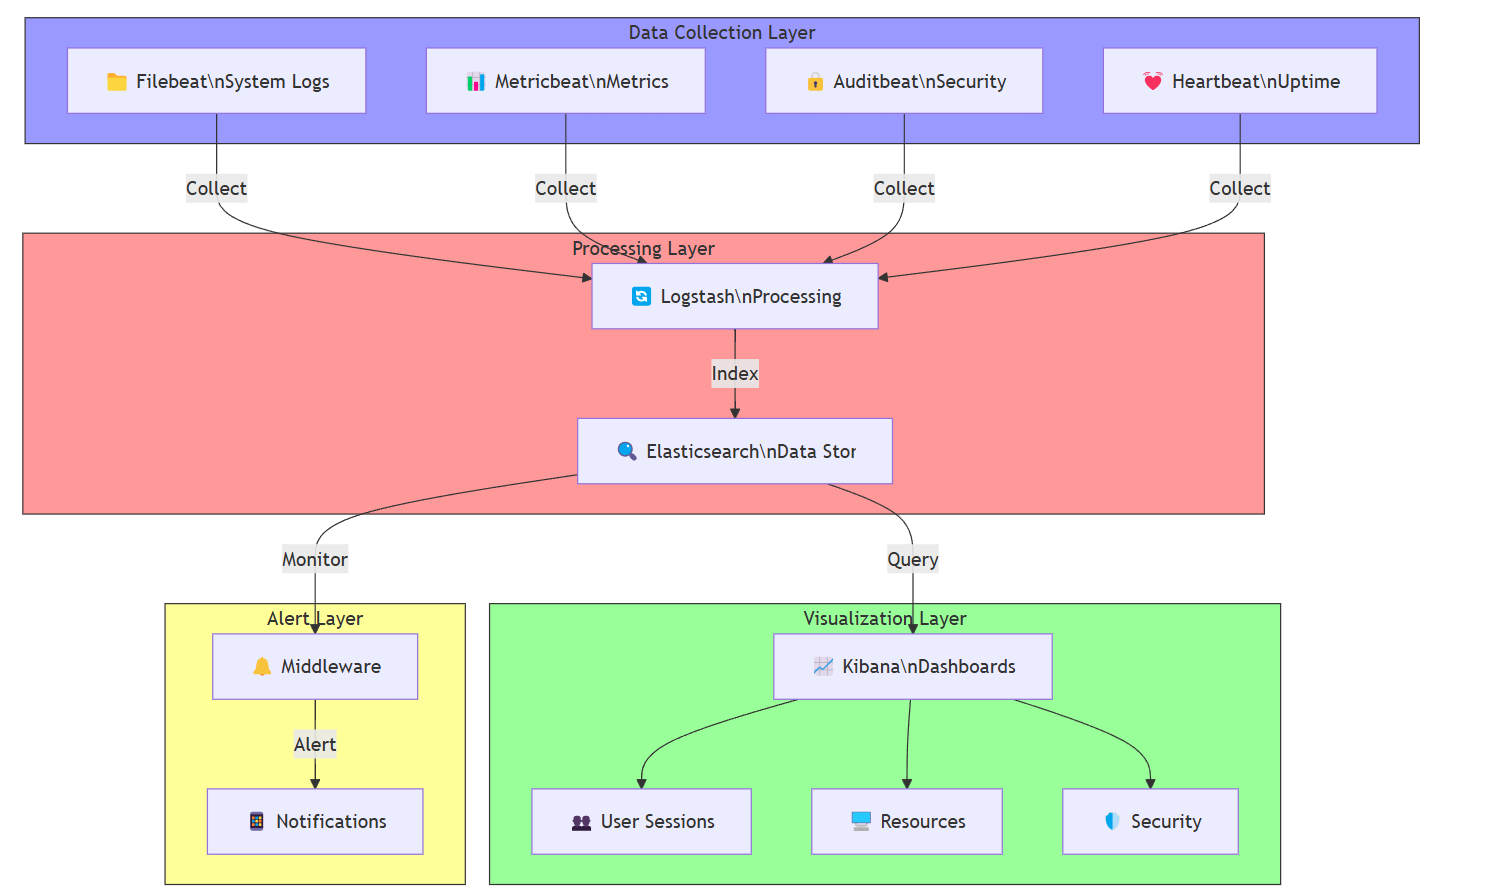
- The Solution: The ELK Stack
- Setting Up the ELK Stack
- What Am I Monitoring?
- Visualizing Data with Kibana
- Adding Alerts with Middleware
This Diwali, I decided to take a break from the usual festivities and dive into a tech project that had been on my mind for a while. I had an old ASUS laptop lying around, and I thought, Why not turn it into a homelab server? The idea was simple: host self-hosted apps, set up a VPN, and run media servers that I could access remotely. Here’s how I did it, step by step.
Step 1: Setting a Static Internal IP
The first thing I needed to do was ensure that the laptop’s internal IP address didn’t change after every reboot. This is crucial because if the IP keeps changing, any services or apps hosted on the laptop would become inaccessible.
I went into Ubuntu’s Wi-Fi settings, navigated to the IPv4 tab, and set a static IP address. This way, the laptop’s IP remains consistent, and I don’t have to worry about reconfiguring my network settings every time I restart the machine.
Step 2: Tackling the External IP Problem
While setting a static internal IP was straightforward, getting a static external IP from my ISP was a whole different story. It was too much of a hassle, and frankly, I didn’t want to deal with it. This meant that hosting apps with a mapped domain wasn’t going to be easy.
I knew about DNS providers like DuckDNS, which offer dynamic DNS services, but I wanted something more customized. So, I decided to write my own Dynamic DNS management script in Node.js.
Building My Own Dynamic DNS Management
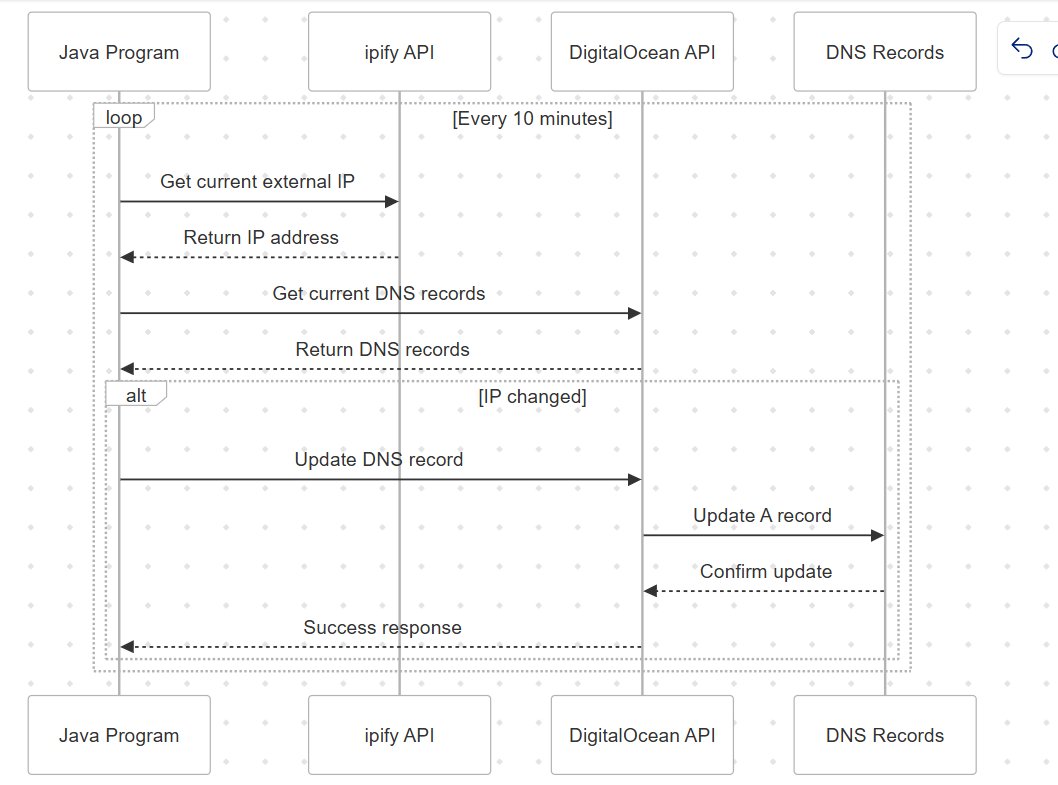
I already had my domain records set up on DigitalOcean, so I used their API to manage my DNS. Here’s what my Node.js script does:
Queries DigitalOcean API: It fetches the current DNS records for my domain.
Gets the Current External IP: Using the
ipifyAPI, it retrieves my current external IP address.Updates DNS if Necessary: If there’s a mismatch between the DNS record and my current IP, the script updates the DNS record on DigitalOcean.
Logs Everything: The script logs all actions with timestamps and sends me notifications so I can keep track of any changes.
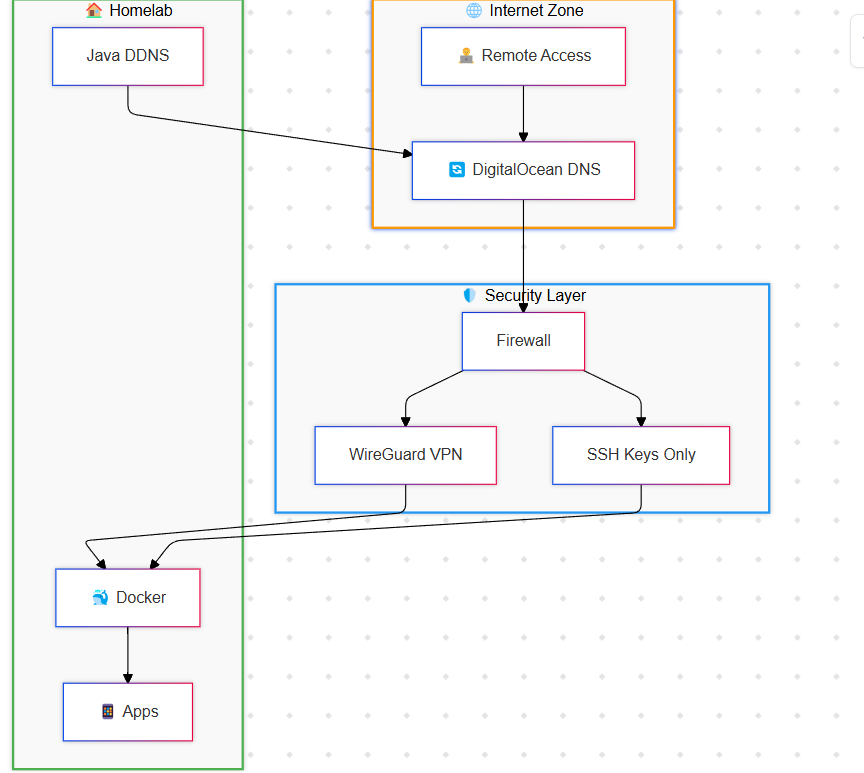
To automate this process, I set up a cron job to run the script every 10 minutes. Now, my domain always points to my dynamic IP, and I can use it for all my self-hosted services without worrying about IP changes.
Step 3: Securing SSH Access
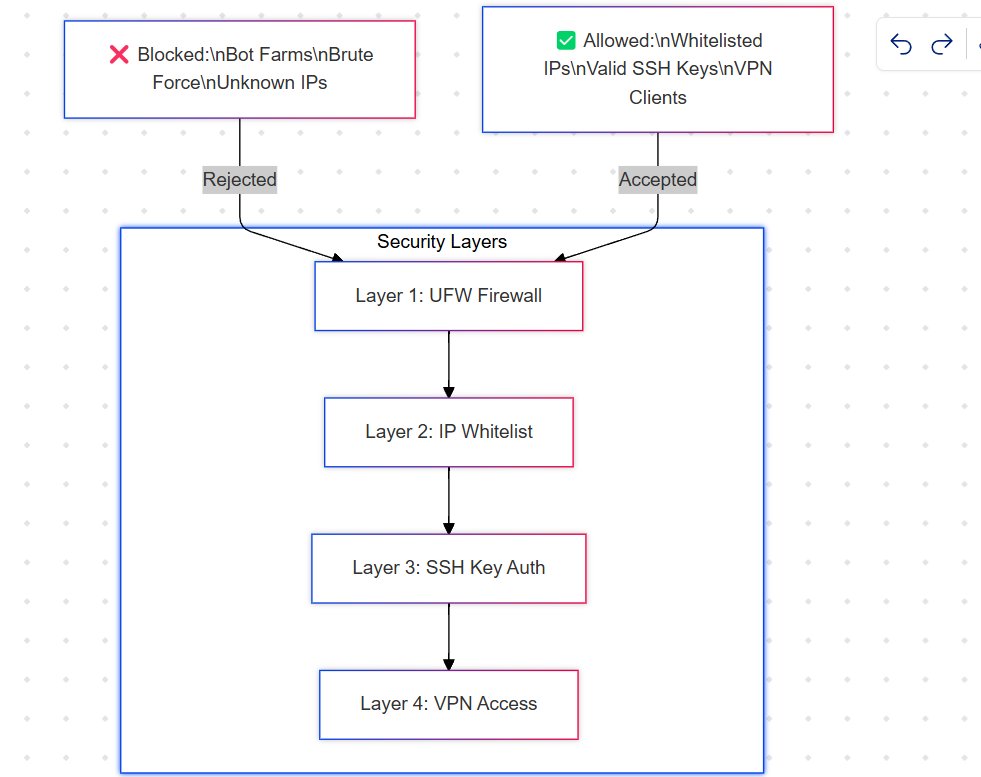
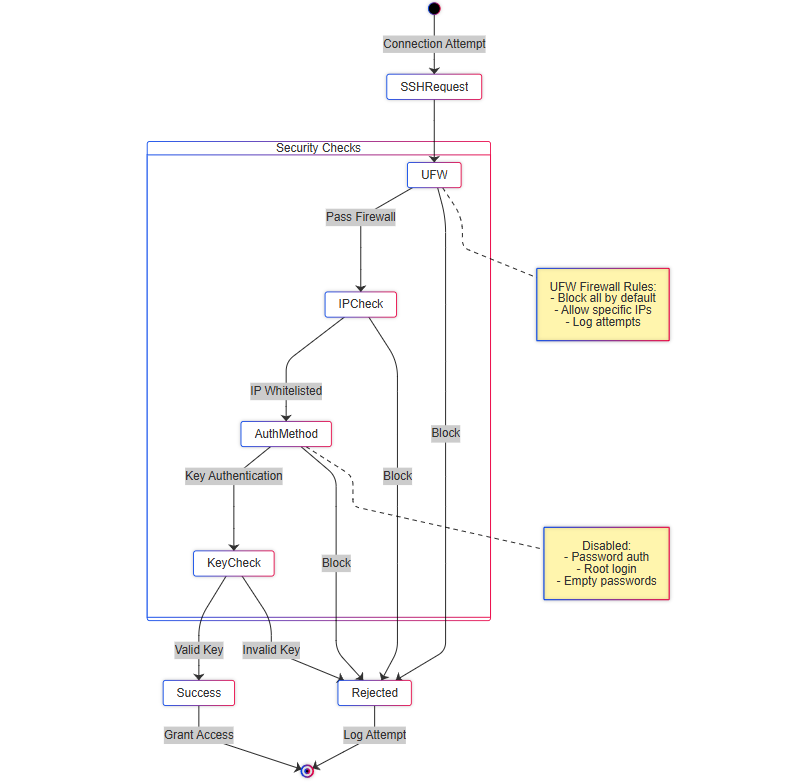
With the IP issues sorted, the next step was to set up SSH access so I could remotely manage the laptop once I returned to my place. I installed OpenSSH and immediately disabled password-based logins. Instead, I enabled SSH key-based authentication only. This is a much more secure way to handle SSH access, as it prevents brute-force attacks.
I set up SSH keys across all the machines I would use to access my homelab. But even with this setup, I noticed something alarming in the SSH logs: bot farms were constantly trying to brute-force their way in. I saw random usernames like “root,” “redis,” and even attempts at SSH keys. It was eye-opening—I thought this kind of stuff only happened in movies, but no, there are actual zombie machines out there running scripts that search for open ports.
Step 4: Setting Up a Firewall
This is where I realized that my university CS classes, where I learned about ports, TCP, and networking, didn’t fully prepare me for the practical side of things. To secure my server, I set up UFW (Uncomplicated Firewall) and enabled it. I only whitelisted my trusted IPs for SSH access. This way, bots can’t even reach the SSH layer, let alone attempt to brute-force it. The result? Clean logs and peace of mind.
Step 5: Hosting Self-Hosted Apps
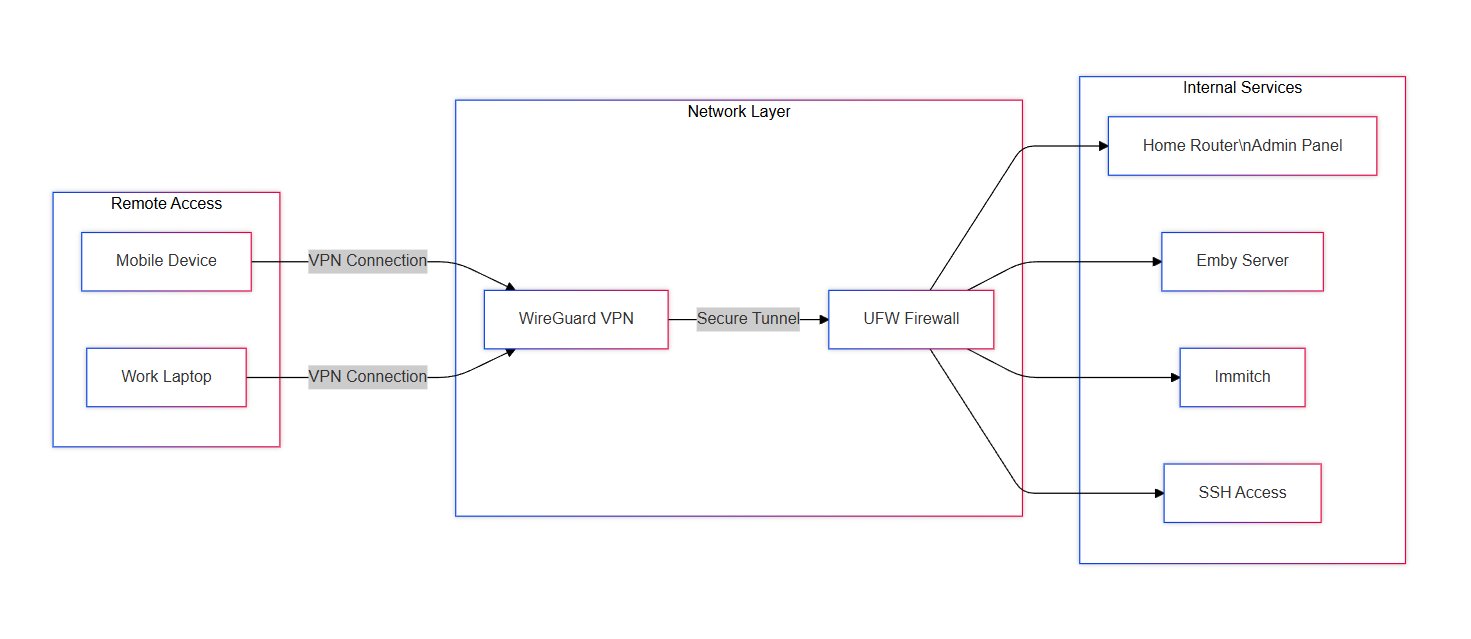
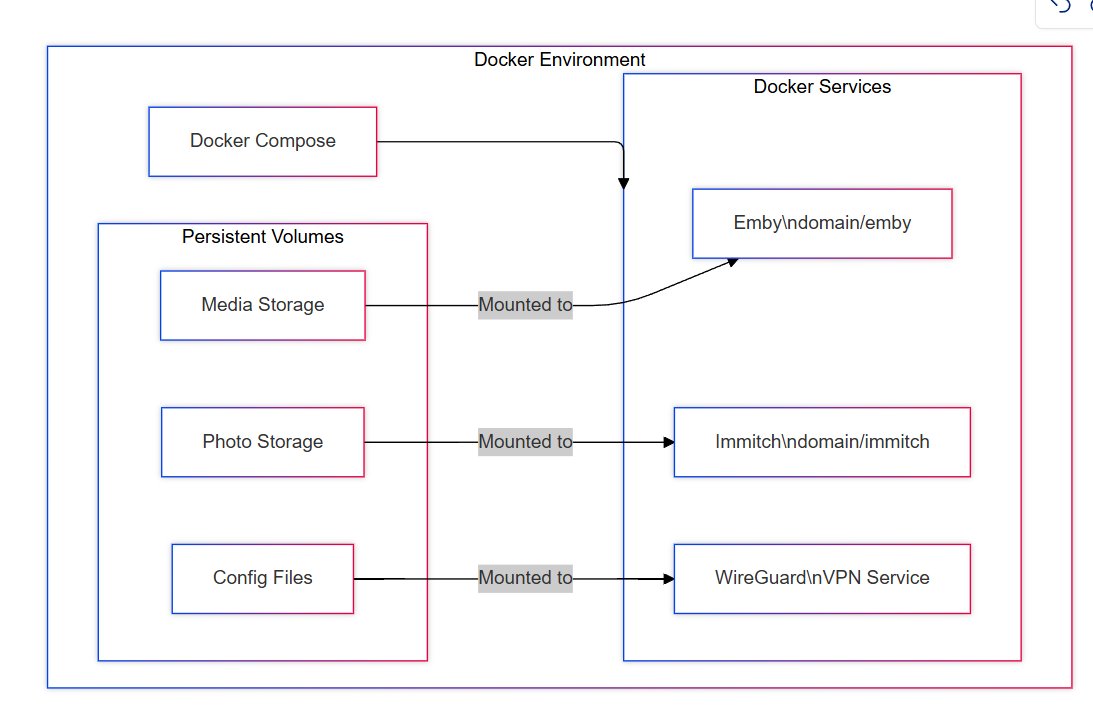
With SSH, dynamic DNS, and IP issues resolved, it was time to start hosting self-hosted apps. The first thing I set up was a WireGuard VPN. I used Docker Compose to manage the setup, port-forwarded the VPN ports, and whitelisted my IP. WireGuard is fantastic because it allows me to access my home router and Ubuntu server remotely as if I’m on the same network.
Here’s a fun fact I discovered: With WireGuard, you can access your router’s web interface remotely as long as you’re connected to the VPN. You don’t need to be on the same Wi-Fi network. This was a game-changer for me. It’s one of those things that you don’t fully grasp until you do it yourself, no matter how much theory you’ve studied.
Step 6: Media and Photo Storage
Next, I hosted Emby and Immich for media and photo storage. Again, I used Docker Compose with persistent volumes to ensure that my data wouldn’t be lost if the containers were restarted. I also added port forwarding in my router, but with a twist: only devices connected to my VPN can access these services. This adds an extra layer of security, ensuring that my media and photos are only accessible to me and those I trust.
Happy Diwali hehe
Homelab Setup Part 2: The Jump Host Solution
The Problem: Dynamic IPs Striking Again
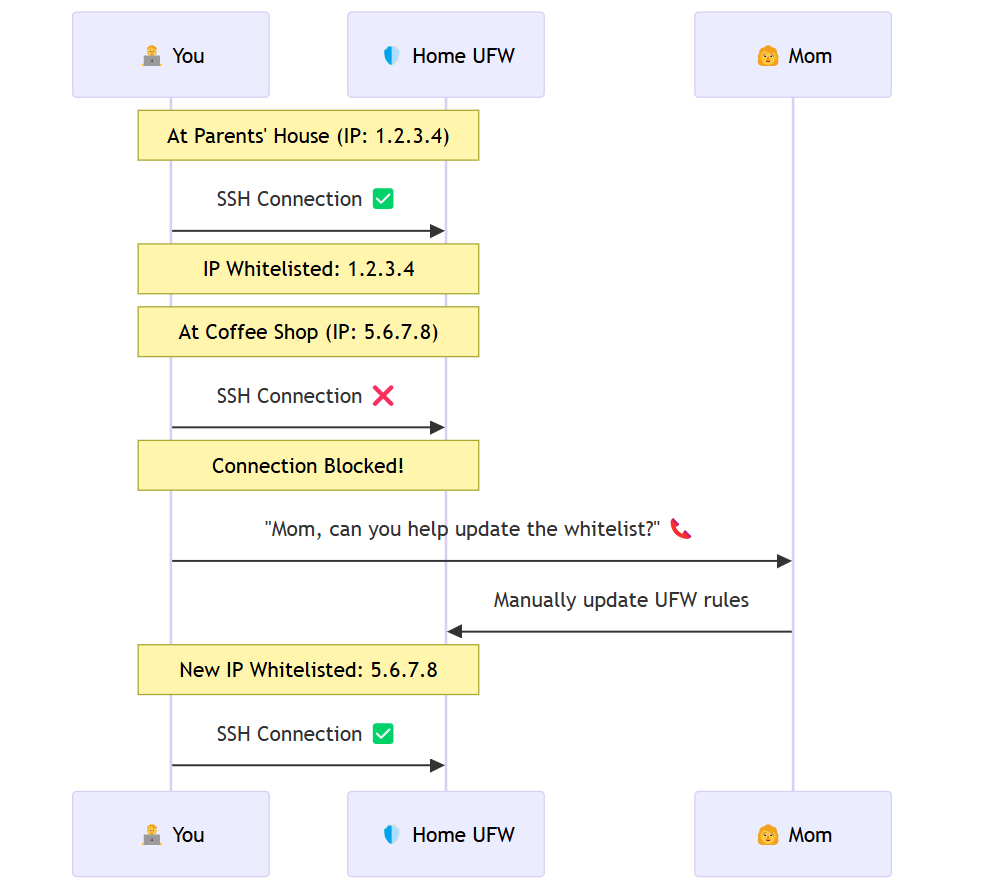
So, here’s the issue: after leaving my parents’ place, I realized that the IPs of the machines I had whitelisted in my home node’s firewall kept changing. This meant that every time my IP changed, I had to call my mom, walk her through opening the laptop, and updating the UFW (Uncomplicated Firewall) whitelist in Ubuntu.
I needed a better solution—one that didn’t involve relying on my mom’s newfound (and reluctant) sysadmin skills.
The Solution: Introducing the Jump Host
The answer to my problem? A jump host. Here’s how I set it up:
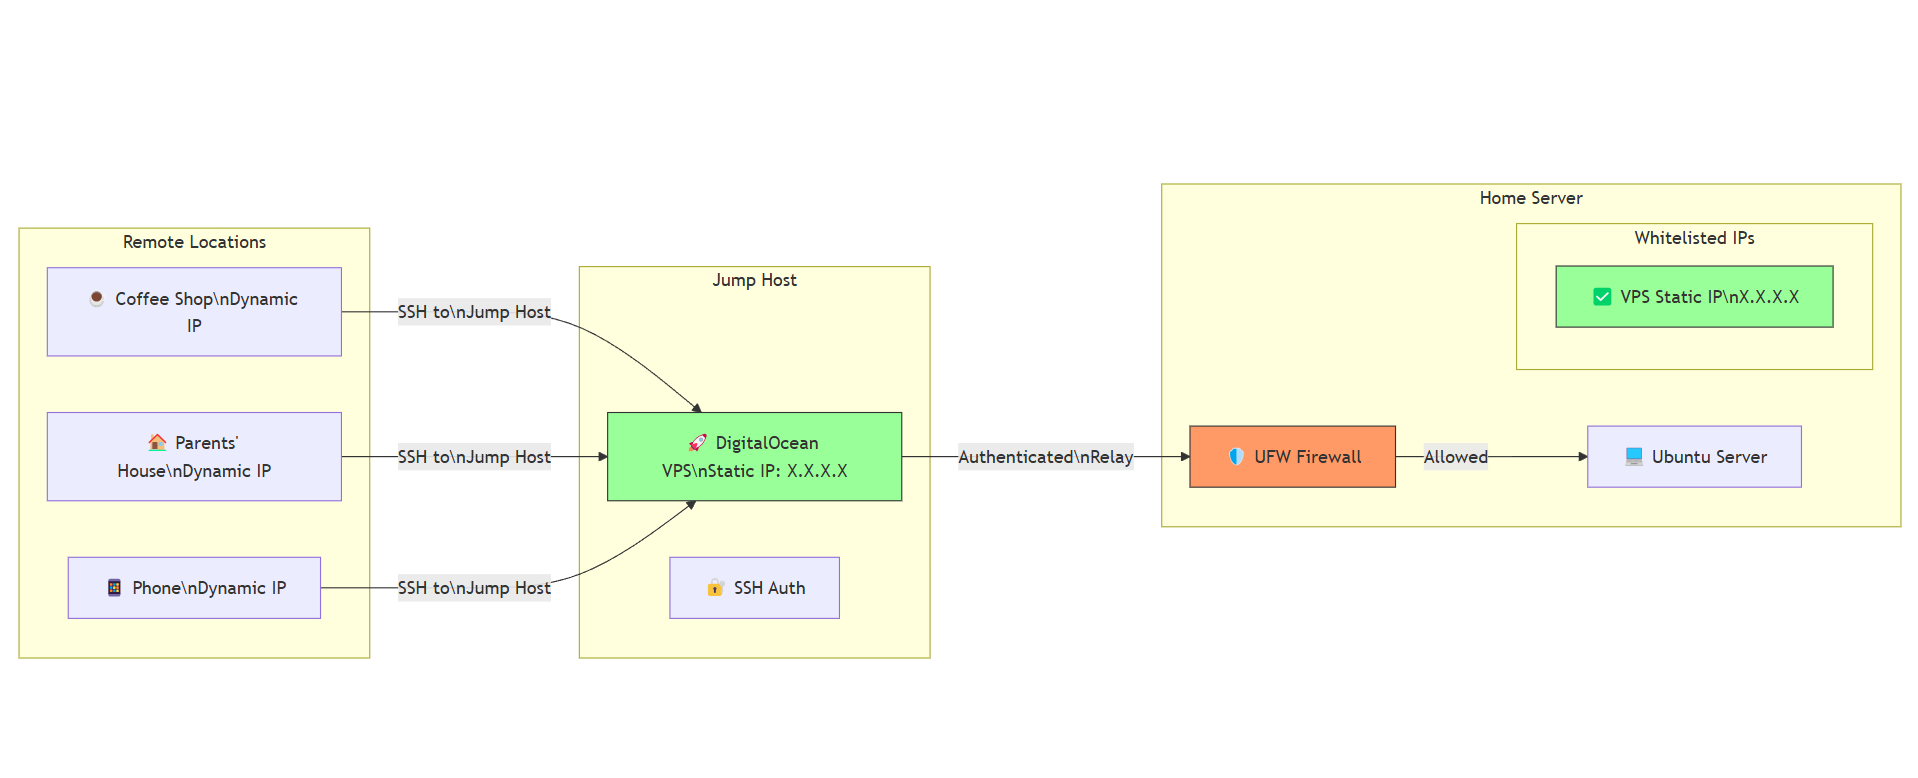
Bought a Cheap DigitalOcean VPS: I grabbed a low-cost Virtual Private Server (VPS) from DigitalOcean. The best part? It comes with a static IP. No more dynamic IP headaches!
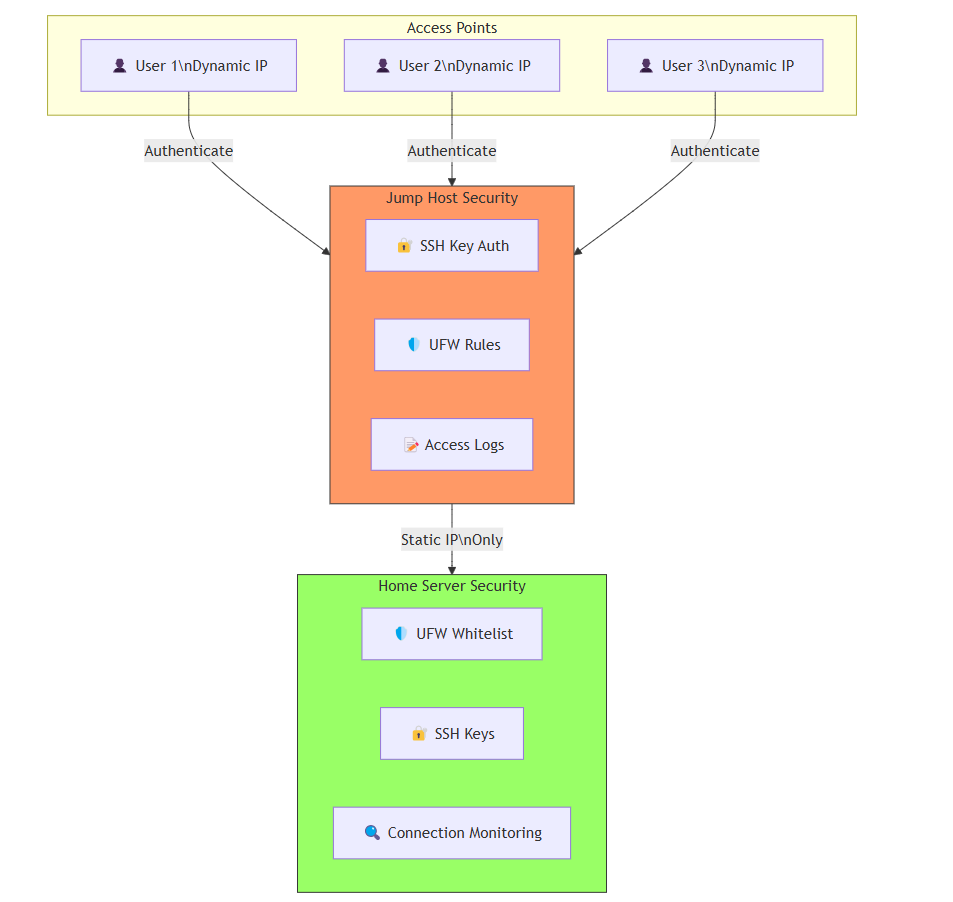
Secured the VPS: I locked it down with SSH key-based authentication, disabled password logins, and set up a firewall to allow only trusted connections. This VPS was going to be the gatekeeper, so security was non-negotiable.
Whitelisted the VPS IP: I added the VPS’s static IP to my home node’s firewall whitelist. Now, the VPS could communicate with my home server without any issues.
How It Works: The Middle Manager
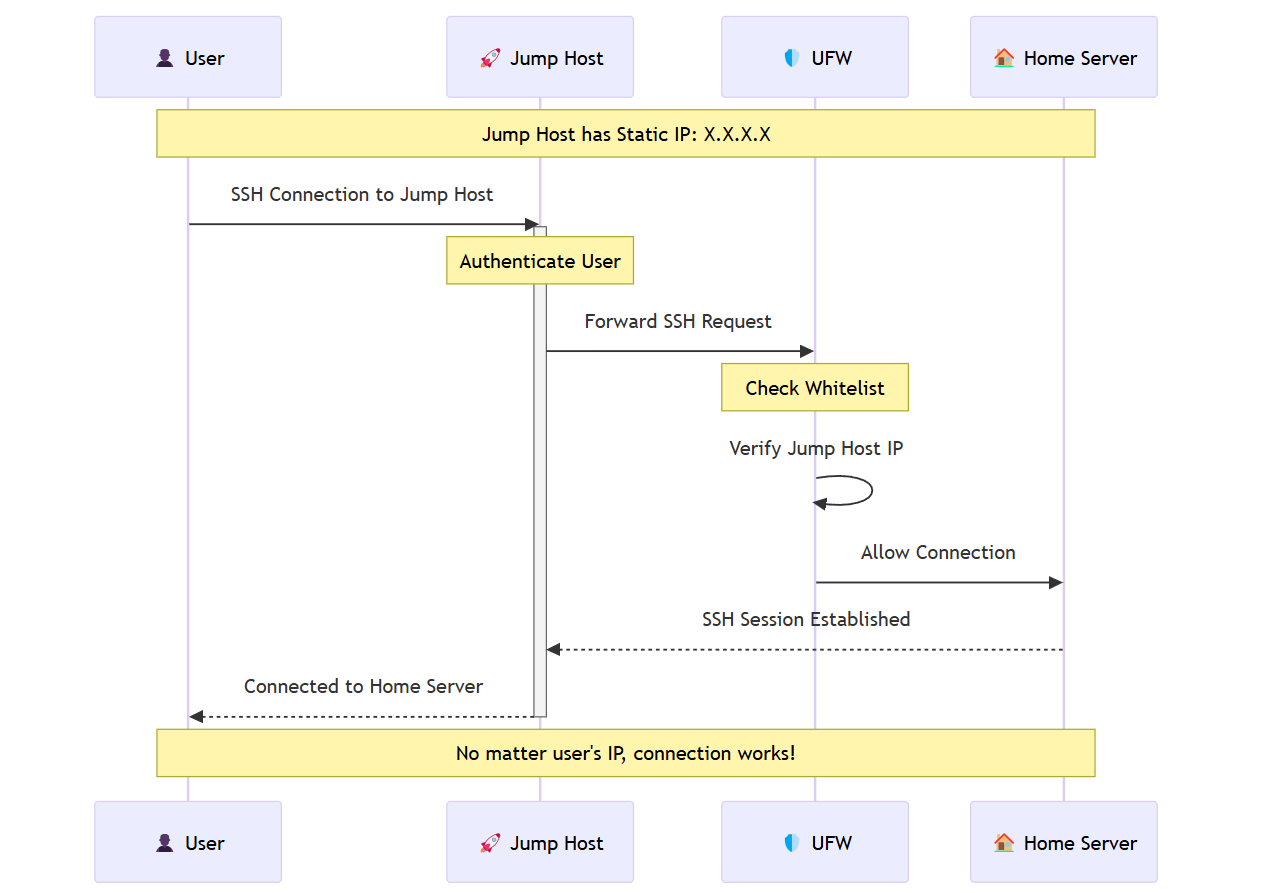
The VPS acts as a middle manager—a central authentication node for all my machines with dynamic IPs. Here’s the flow:
Machines Connect to the VPS First: Whenever I need to access my home server, my machine (with its ever-changing IP) connects to the VPS first.
VPS Authenticates with the Home Node: The VPS, with its static IP, authenticates with my home server on my behalf. Since the VPS’s IP is whitelisted, it can relay my SSH requests securely.
SSH Requests Are Relayed: The VPS forwards my SSH connection to my home server, acting as a secure bridge between my machine and the homelab.
Homelab Part 3: Automating the Dynamic IP Problem—The Hard Way
In Part 2, I solved the dynamic IP issue by setting up a jump host—a simple and effective solution.
While the jump host setup works beautifully for changing ip, I’m sticking to my principle of handling my own stack.
The Plan: A Fully Automated System
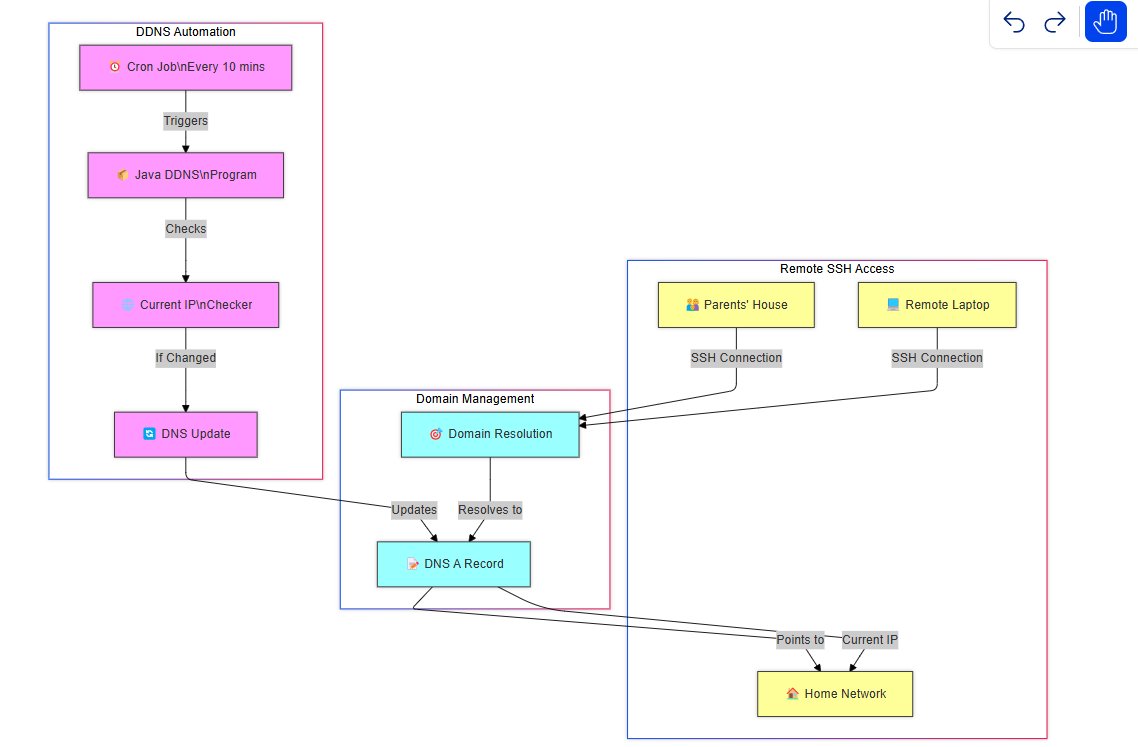
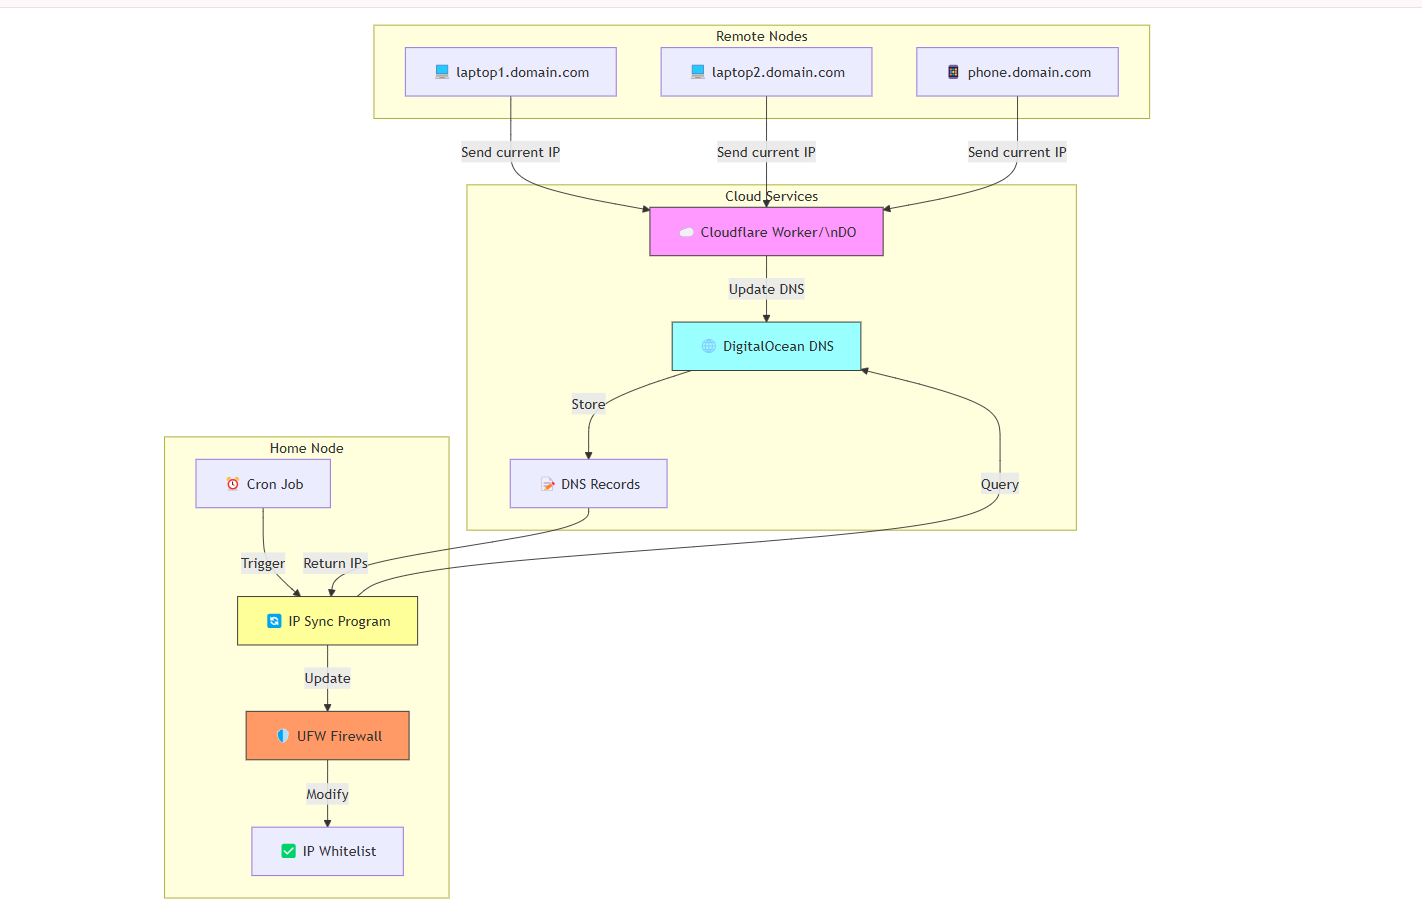
The goal was to create a system where the UFW (Uncomplicated Firewall) whitelist on my home node would automatically update with the latest IPs of my connecting machines—no manual intervention required. Here’s how I approached it:
Assign Domains to All Connecting Machines: Each machine gets its own subdomain (e.g.,
laptop1.mydomain.com), and its IP is mapped to that domain.Home Node Program: A script that fetches the latest IPs from DNS records and updates the UFW whitelist.
Connecting Nodes Program: A script on each machine that periodically updates its IP in the DNS records.
Together, these two programs form a closed loop that keeps everything in sync.
Step 1: Assigning Domains to Connecting Machines
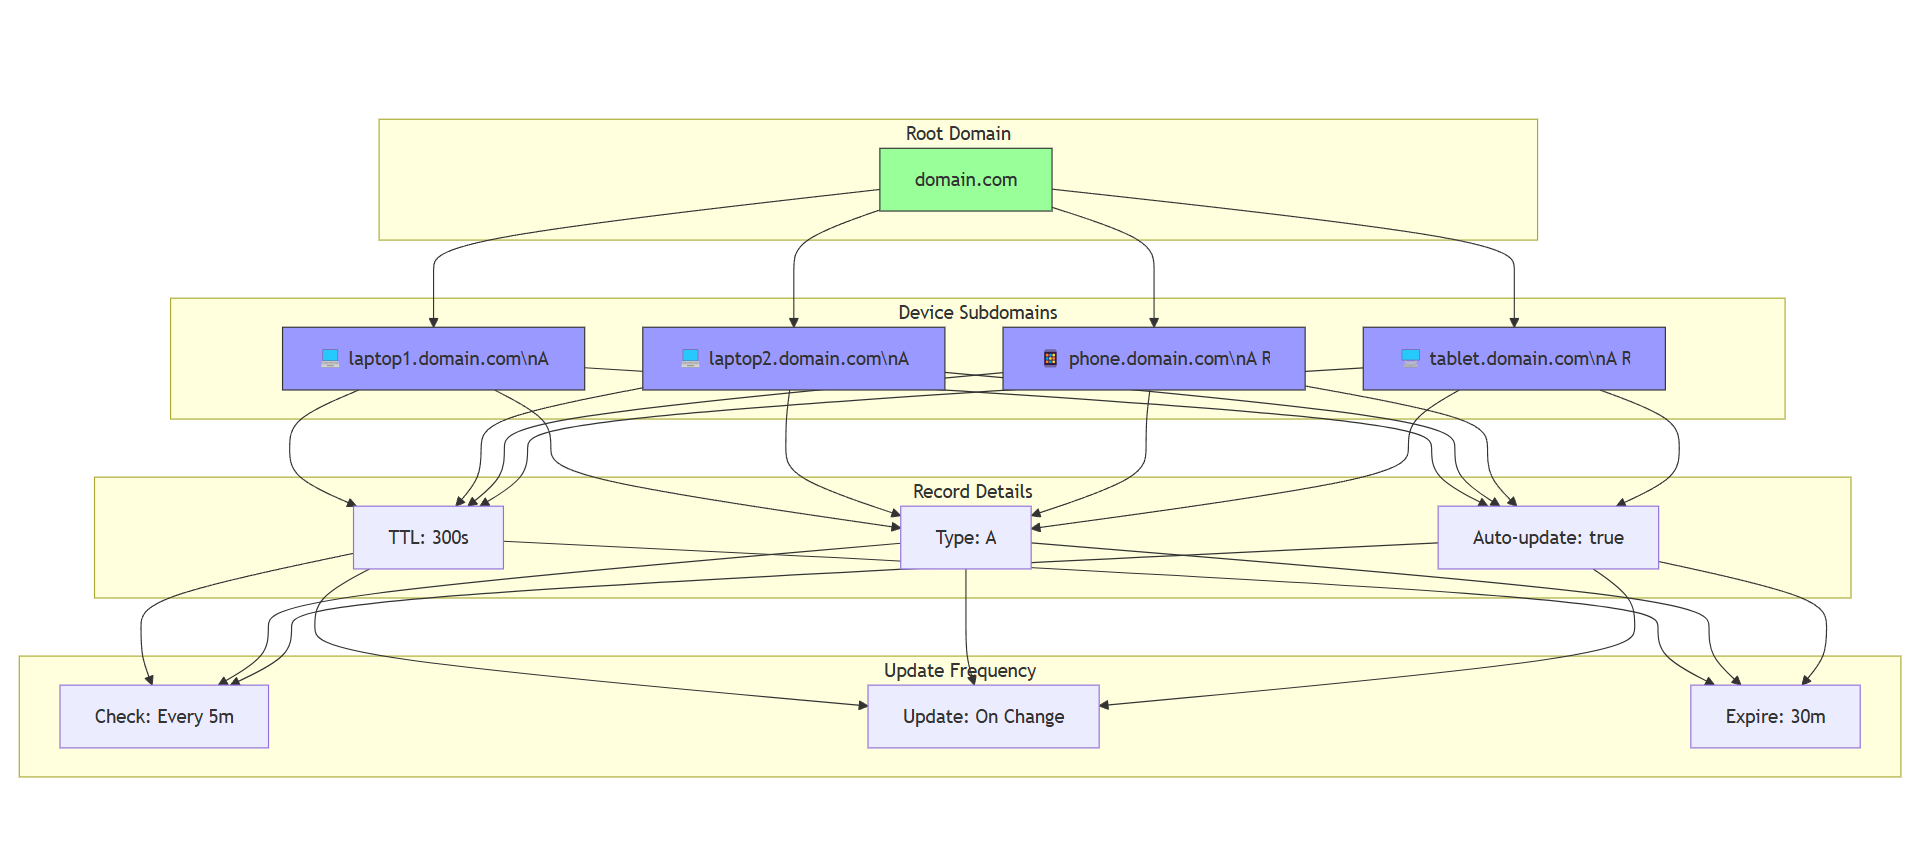
First, I mapped each connecting machine to a unique subdomain on DigitalOcean’s DNS records. For example:
This way, each machine’s IP is tied to a domain, and I can use these domains to dynamically update the firewall whitelist.
Step 2: The Home Node Program
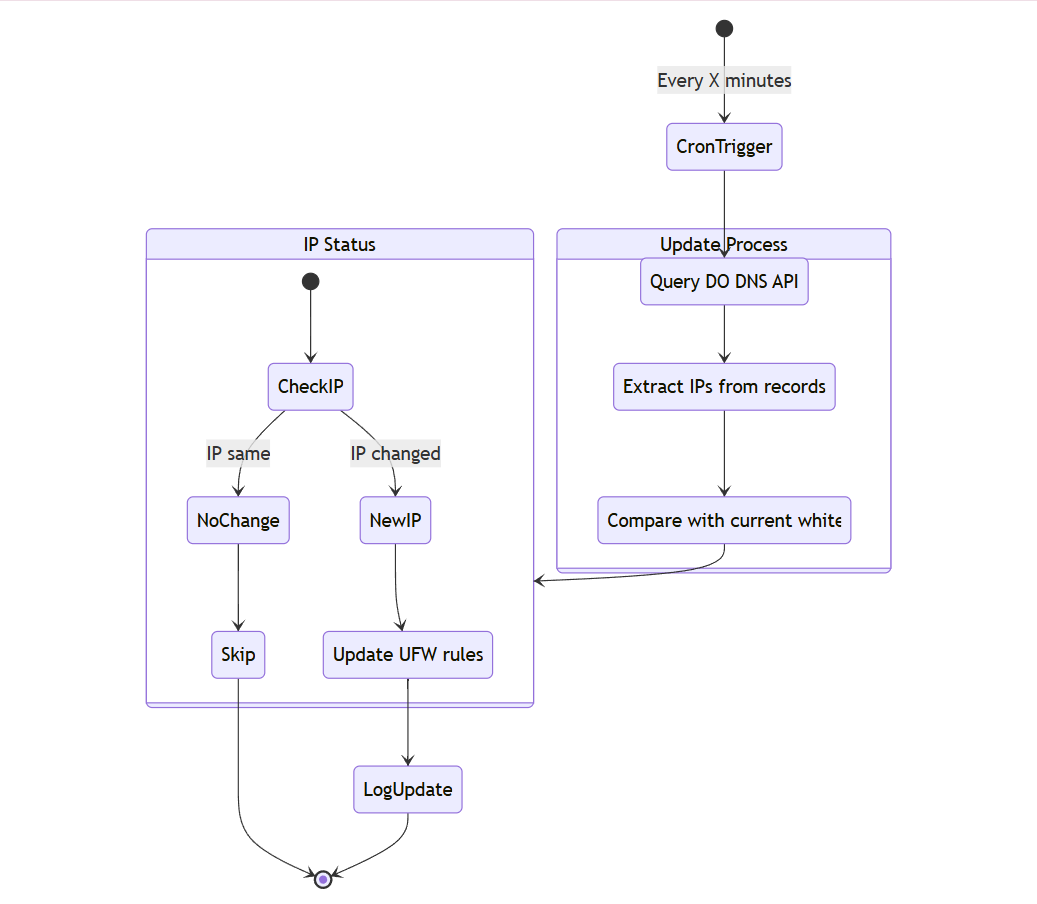
The home node’s script is responsible for fetching the latest IPs from the DNS records and updating the UFW whitelist. Here’s what it does:
Query DigitalOcean’s DNS Records: Using DigitalOcean’s API, the script fetches the latest IPs for all subdomains.
Update the UFW Whitelist: It compares the fetched IPs with the current UFW whitelist and updates it if there’s a mismatch.
Run Periodically: I set up a cron job to run this script every 10 minutes, ensuring the whitelist is always up to date.
This way, the home node’s firewall always has the latest IPs of the connecting machines.
Step 3: The Connecting Nodes Program
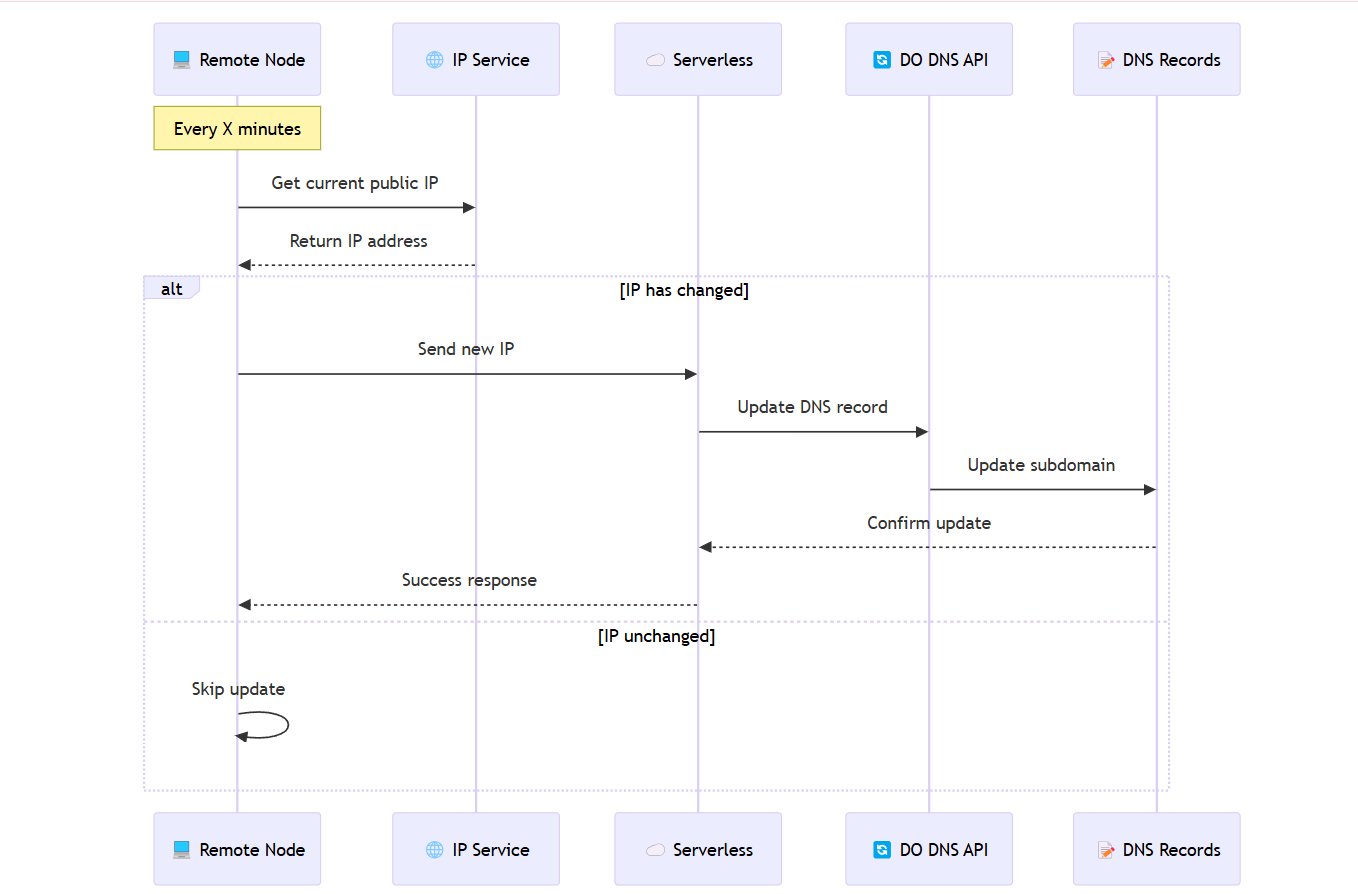
Each connecting machine has its own script that periodically updates its IP in the DNS records. Here’s how it works:
Get the Current Public IP: The script uses a service like
ipifyto fetch the machine’s current public IP.Update DNS Records: It sends this IP to a serverless function (I used Cloudflare Workers, but DigitalOcean Serverless Functions would work too) that updates the corresponding DNS record on DigitalOcean.
Run Periodically: A cron job runs this script every 5 minutes, ensuring the DNS records are always updated with the latest IP.
The Closed Loop: How It All Works Together
Here’s the beauty of this system: it’s a closed, automated loop.
Connecting Nodes Update DNS: Each machine periodically updates its IP in the DNS records.
Home Node Fetches IPs: The home node periodically fetches these IPs from the DNS records.
UFW Whitelist is Updated: The home node updates its firewall whitelist with the latest IPs.
This ensures that, no matter how often the IPs of the connecting machines change, the home node’s firewall is always up to date.
Homelab Part 4: Adding a Monitoring Layer with the ELK Stack
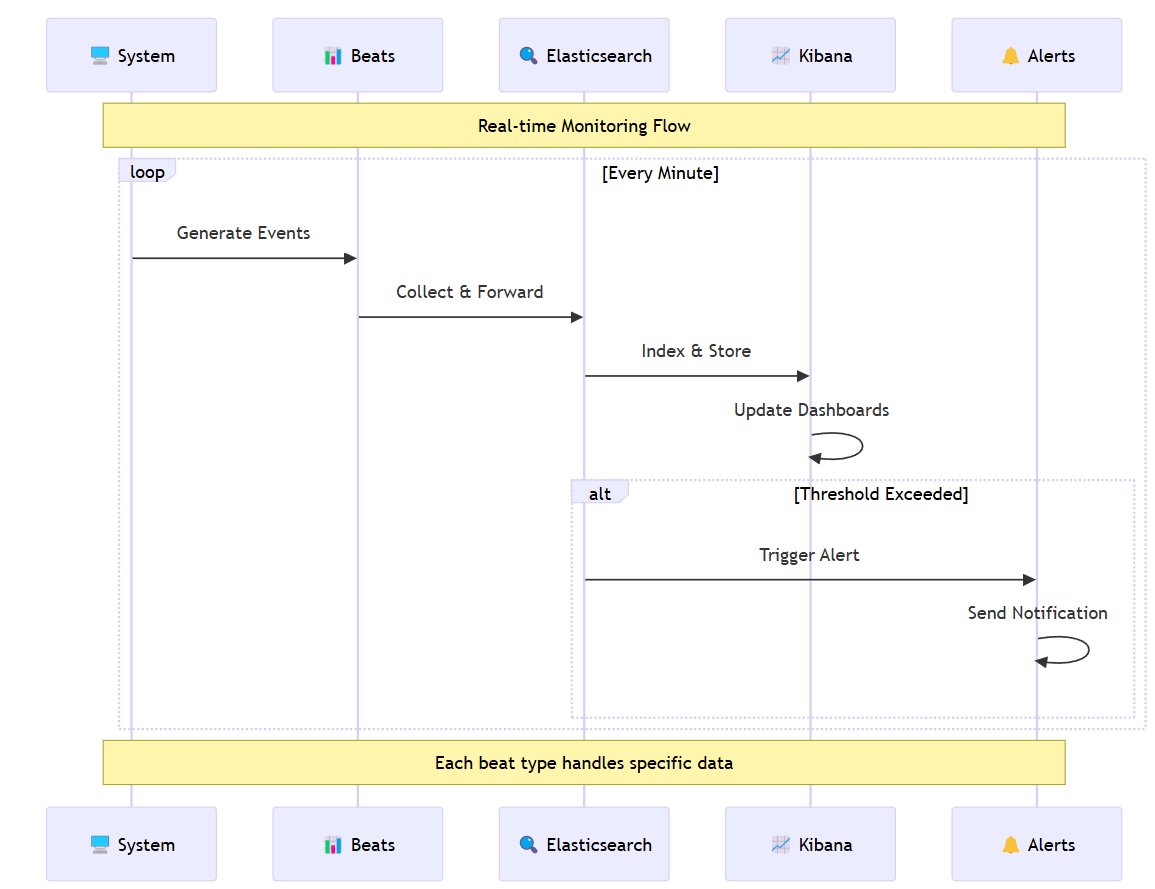
In the previous parts of my homelab journey, I tackled dynamic IPs, automated firewall updates, and secured remote access. But as my homelab grew, I realized I needed a better way to monitor what was happening across my system. Manually SSHing into the server and running tail -f or grep on logs was fine for a while, but it quickly became tedious and inefficient. Enter the ELK Stack—Elasticsearch, Logstash, and Kibana. Here’s how I set up a robust monitoring layer for my homelab.
The Problem: Scattered Logs and Metrics
The first issue I faced was that logs and metrics were scattered everywhere:
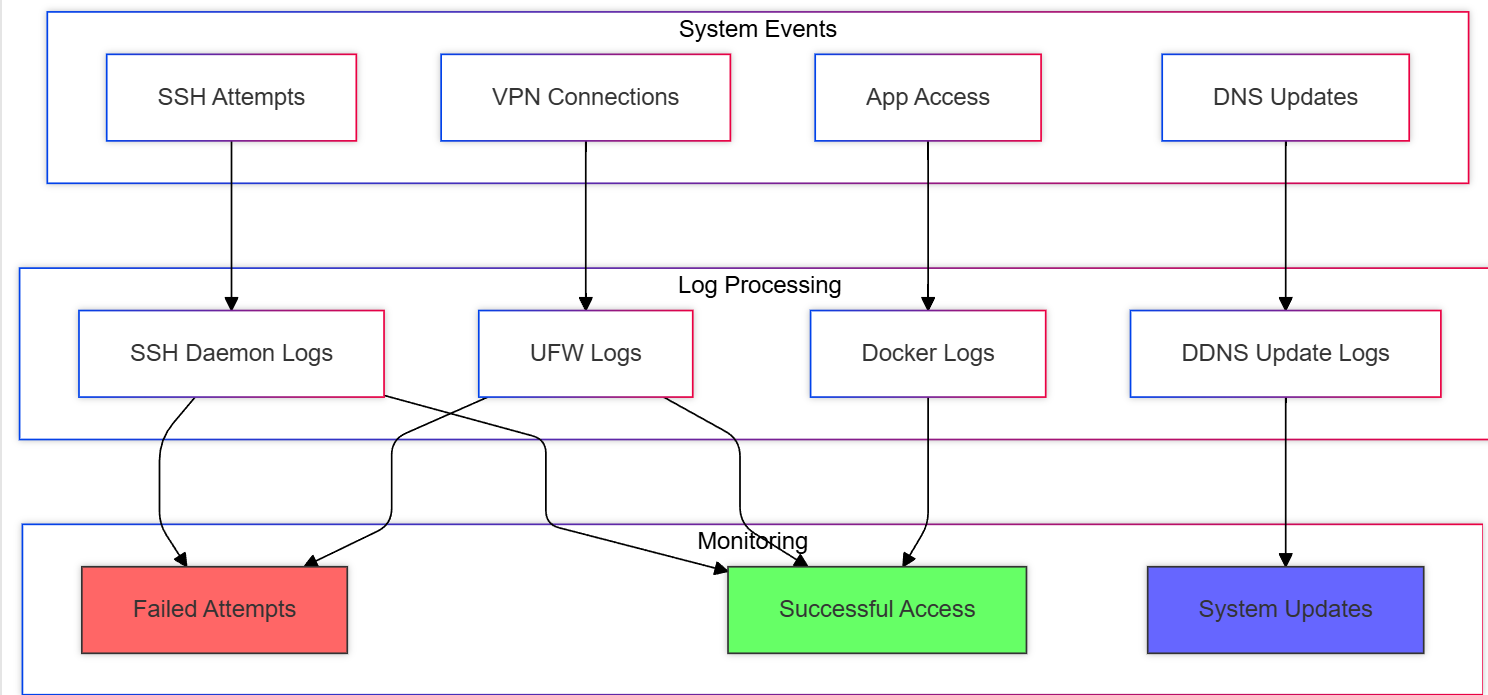
SSH logs: Who’s logging in and when?
Container logs: Which containers are running, and are they behaving?
System metrics: Is my server overheating? Is the disk space running low?
Network patterns: What’s eating up my bandwidth?
Manually sifting through /var/log or running docker stats wasn’t cutting it anymore. I needed a centralized way to collect, analyze, and visualize all this data.
The Solution: The ELK Stack
The ELK Stack is a powerful trio of tools for log and metric management:
Elasticsearch: A search and analytics engine that stores and indexes the data.
Logstash: A data processing pipeline that ingests and transforms logs.
Kibana: A visualization tool that turns data into interactive dashboards.
But the real magic lies in Beats—lightweight data shippers that collect logs and metrics from your system and send them to Elasticsearch.
Setting Up the ELK Stack
Here’s how I set it up:
Docker Compose: I used Docker Compose to spin up the ELK Stack. One
docker-compose.ymlfile, and I was up and running in minutes.Beats for Data Collection:
Filebeat: Collects system logs (e.g., SSH logs, container logs).
Metricbeat: Gathers system and container metrics (CPU, memory, disk usage).
Auditbeat: Monitors security-related events (e.g., file changes, user activity).
Pre-Built Modules: Elastic provides pre-built modules for parsing different types of logs (e.g., SSH, Docker, system logs). No need to write custom parsers—just enable the modules, and you’re good to go.
What Am I Monitoring?
With the ELK Stack in place, I set up monitoring for the following:
SSH Logins/Logouts:
Who’s accessing my server?
When are they logging in and out?
Are there any failed login attempts?
Container Resource Usage:
Which containers are using the most CPU, memory, or disk?
Are any containers misbehaving or hogging resources?
Network Patterns:
What’s consuming my bandwidth?
Are there any unusual network activities?
System Vitals:
Is my server overheating?
How much disk space is left?
Are there any power-related issues?
Visualizing Data with Kibana
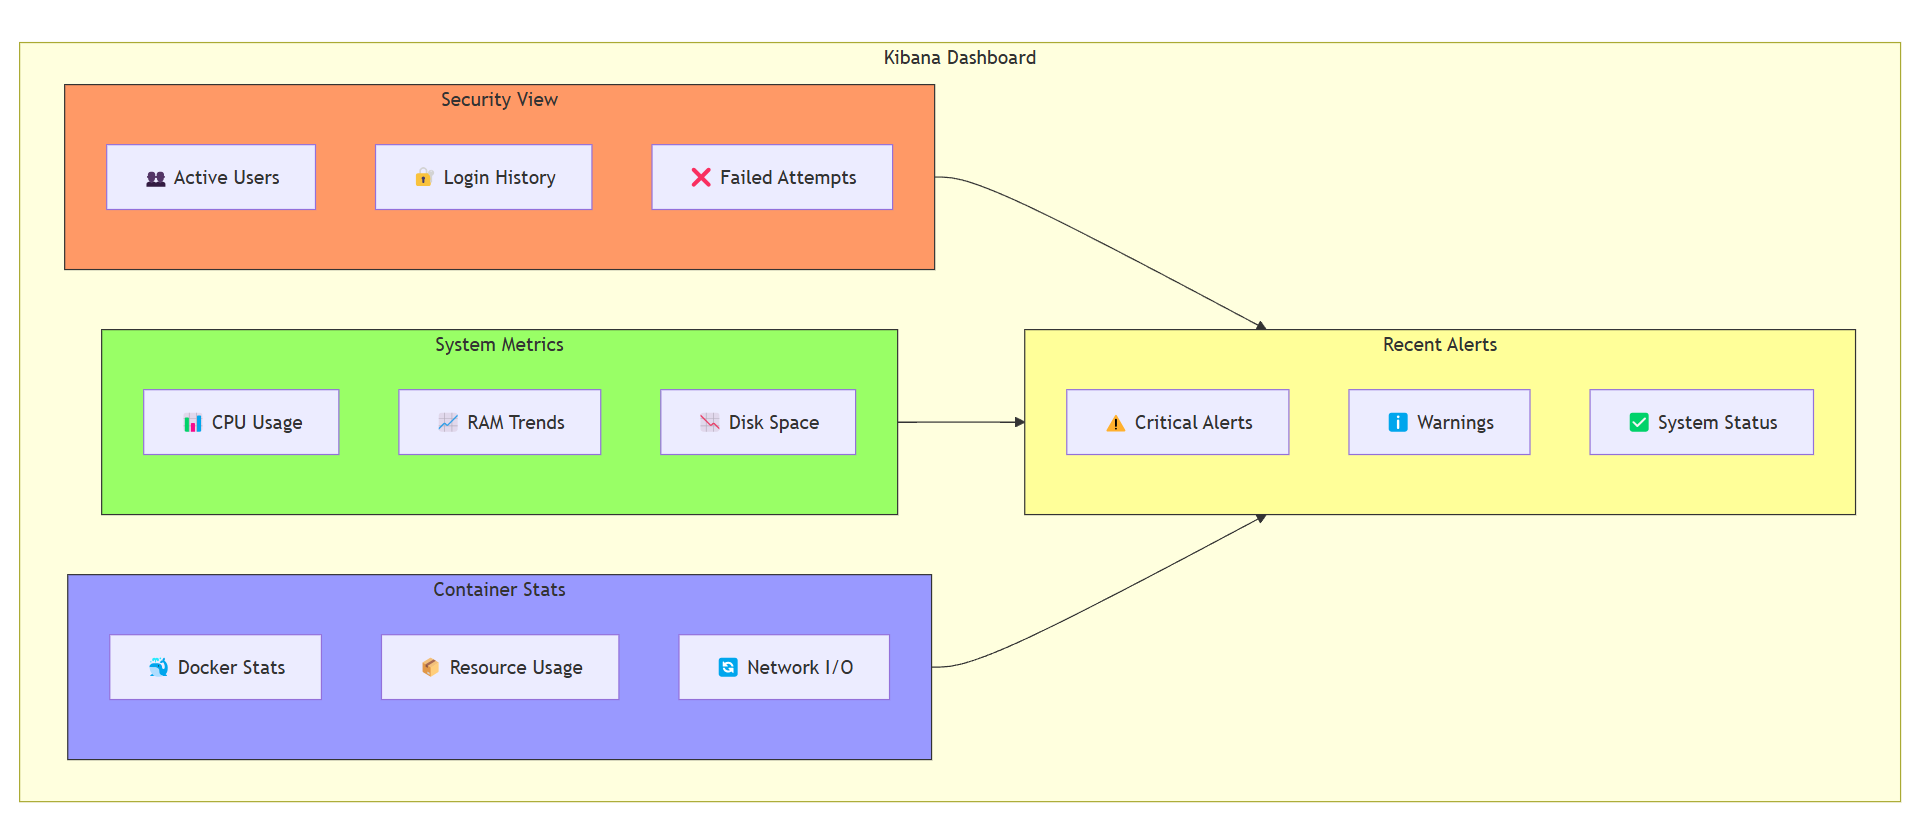
Kibana is where the magic happens. It’s a powerful dashboarding tool that turns raw data into interactive visualizations. Here’s what I set up:
SSH Activity Dashboard: Tracks login/logout events and failed attempts.
Container Metrics Dashboard: Shows CPU, memory, and disk usage for each container.
Network Traffic Dashboard: Visualizes bandwidth usage and network patterns.
System Health Dashboard: Monitors disk space, temperature, and power inputs.
With these dashboards, I can quickly spot anomalies and take action before they become problems.
Adding Alerts with Middleware
To make the system even more proactive, I wrote a simple middleware that watches the metrics and sends me notifications when:
Someone Logs In: A friendly “👋 hello there!” notification to let me know who’s accessing the server.
A Container Goes Resource-Crazy: Alerts me if a container is using too much CPU, memory, or disk.
System Starts Heating Up: Warns me if the server temperature is rising.
Disk Space is Low: Notifies me when disk space is running out.
Container Status Changes: Alerts me if a container stops or crashes.
The yap ends here ✌
