


Table of contents
In this Blog, I will tell you steps and procedures you need to follow to do Molecular Docking.
Introduction
In the vast landscape of drug discovery, one key question looms large: How do scientists identify molecules that can interact with specific proteins, ultimately leading to groundbreaking therapies? The answer lies in the fascinating realm of molecular docking, a computational technique that has revolutionized the way we explore the interactions between small molecules (ligands) and biological macromolecules (receptors). In this blog, we embark on a journey into the intricate world of molecular docking, unraveling its complexities through a simple example.
Imagine you have a lock (receptor) and a key (ligand). The lock is a protein in your body, perhaps an enzyme or a receptor on the surface of a cell. The key is a small molecule, such as a drug candidate. The challenge is to find the perfect fit, where the key can seamlessly slide into the lock, triggering a specific biological response. This perfect fit, or binding, is what molecular docking seeks to uncover.
While the analogy simplifies the concept, the reality is far more intricate. Molecular docking involves complex algorithms and mathematical models to predict the most favorable binding poses and energies. It's a critical tool in the early stages of drug development, allowing researchers to virtually test thousands of potential drug candidates against specific protein targets.
In the following sections, we'll dive into the technical aspects of molecular docking, exploring the software, methodologies, and steps involved
Start /Steps:
Step 1: Software Installation and Preparation
Install AutoDock Vina:
Download AutoDock Vina from the official website or a trusted source.Follow the installation instructions provided for your operating system.Ensure that AutoDock Vina is correctly installed and accessible from the command line.
Prepare Molecular Structures:
Ligand:
Obtain the 3D structure of your ligand (e.g., pantoprazole) in a suitable file format (commonly SDF, MOL2, or PDB).Receptor:
Acquire the 3D structure of your receptor (e.g., proton pump) in a compatible format (usually PDB).
Convert Files (if necessary):
Use software like Open Babel to convert your ligand and receptor structures to PDBQT format, which is required for AutoDock Vina. The conversion command might look like this:babel -i INPUT_FORMAT -o pdbqt -f OUTPUT_FORMAT -l ligand.pdb OUTPUT.pdbqt
Step 2: Ligand Preparation
Ligand Structure Validation:
Ensure the 3D structure of the ligand is free of errors or artifacts. Validate it using molecular modeling software or online tools.
Ligand Optimization (if needed):
Optimize the ligand structure by minimizing energy and resolving any steric clashes or unfavorable conformations. Tools like Avogadro or Pybel can assist in this step.
Assign Charges:
Assign appropriate charges to the ligand atoms using methods like Gasteiger charges or other charge calculation programs.
Generate Ligand PDBQT File:
Convert the ligand structure to PDBQT format using Open Babel or a similar tool. PDBQT format includes atomic charges and is compatible with AutoDock Vina.
Step 3: Receptor Preparation
Receptor Structure Validation:
Validate the 3D structure of the receptor (e.g., proton pump) for accuracy and structural integrity. Address any structural issues, such as missing atoms or residues.
Add Missing Atoms and Hydrogens:
Use molecular modeling software or tools like AutoDock Tools to add missing atoms and hydrogens to the receptor structure. Ensure completeness and realism.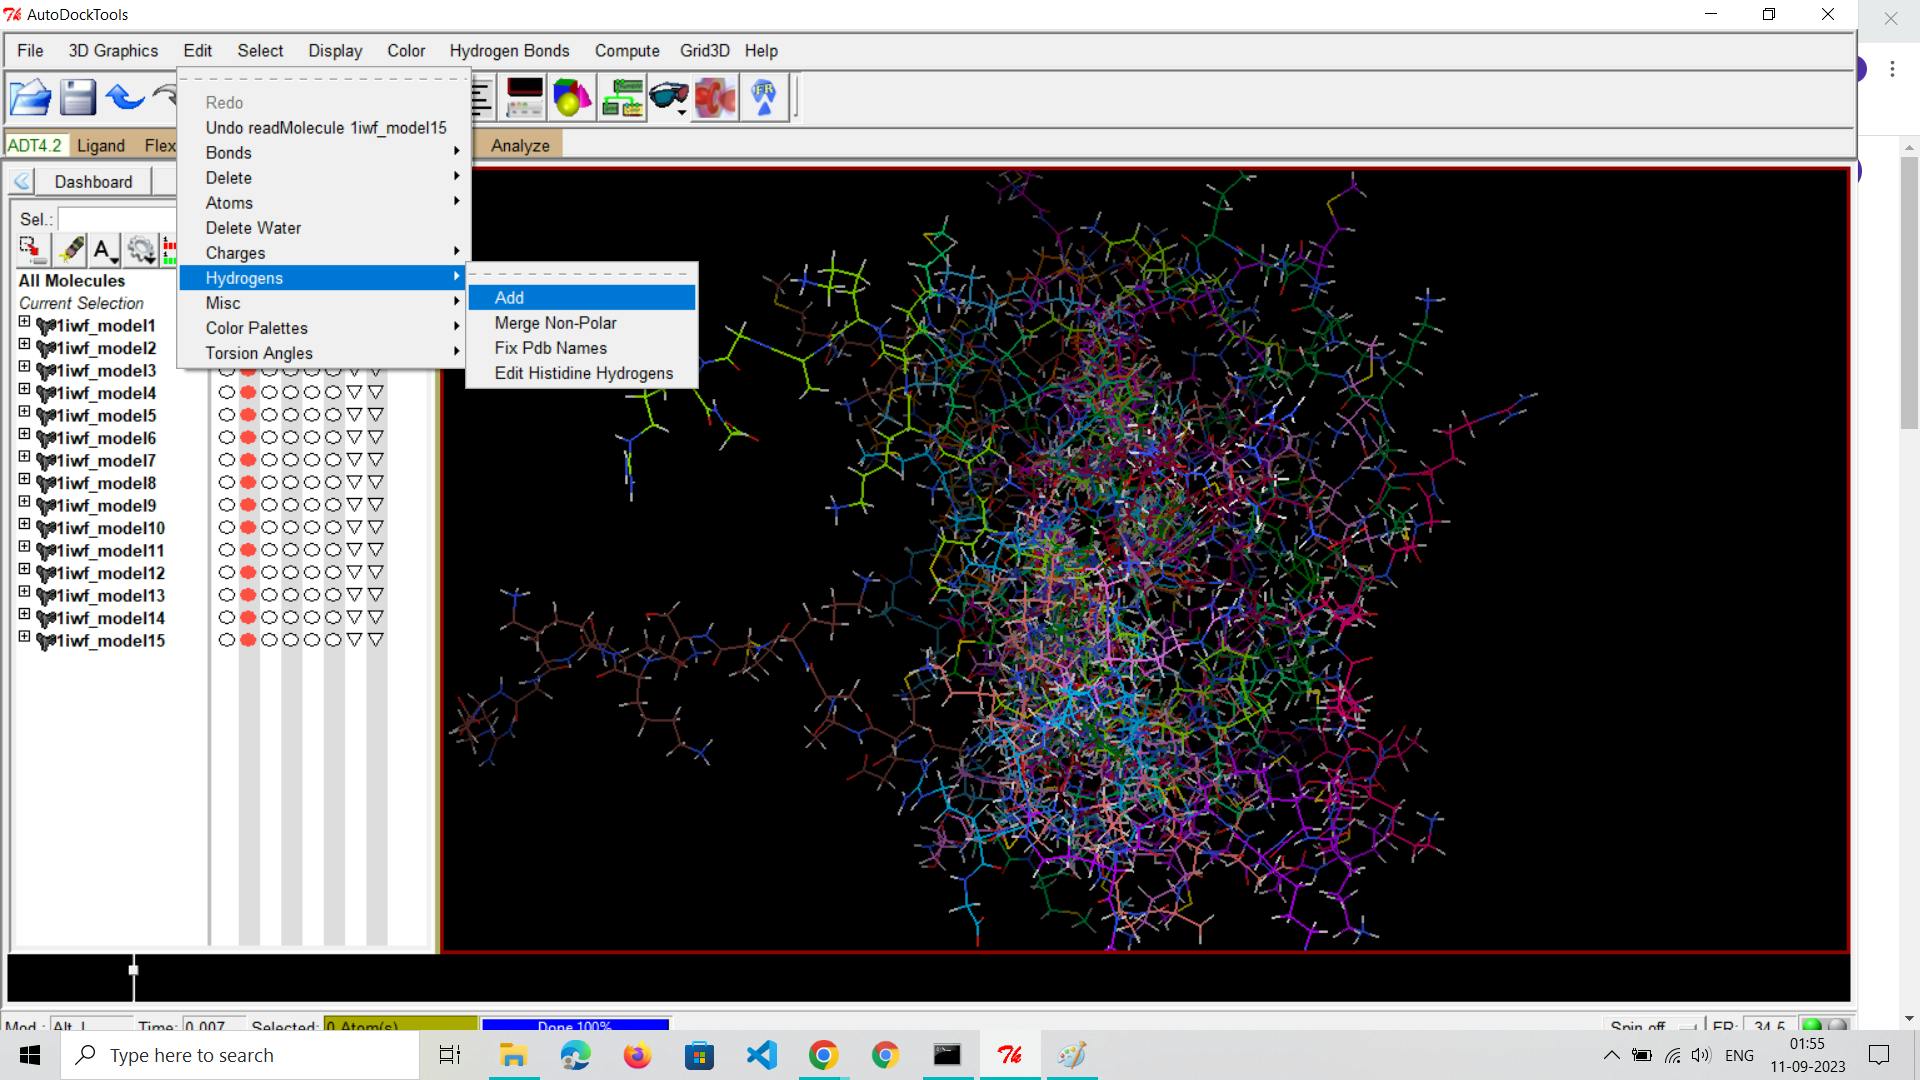
Remove Water and Non-Essential Molecules:
Eliminate water molecules and any non-essential components from the receptor structure, retaining only biologically relevant parts.

Assign Charges:
Assign appropriate charges to the receptor atoms. Ensure that the charges are consistent with the force field parameters to be used during docking.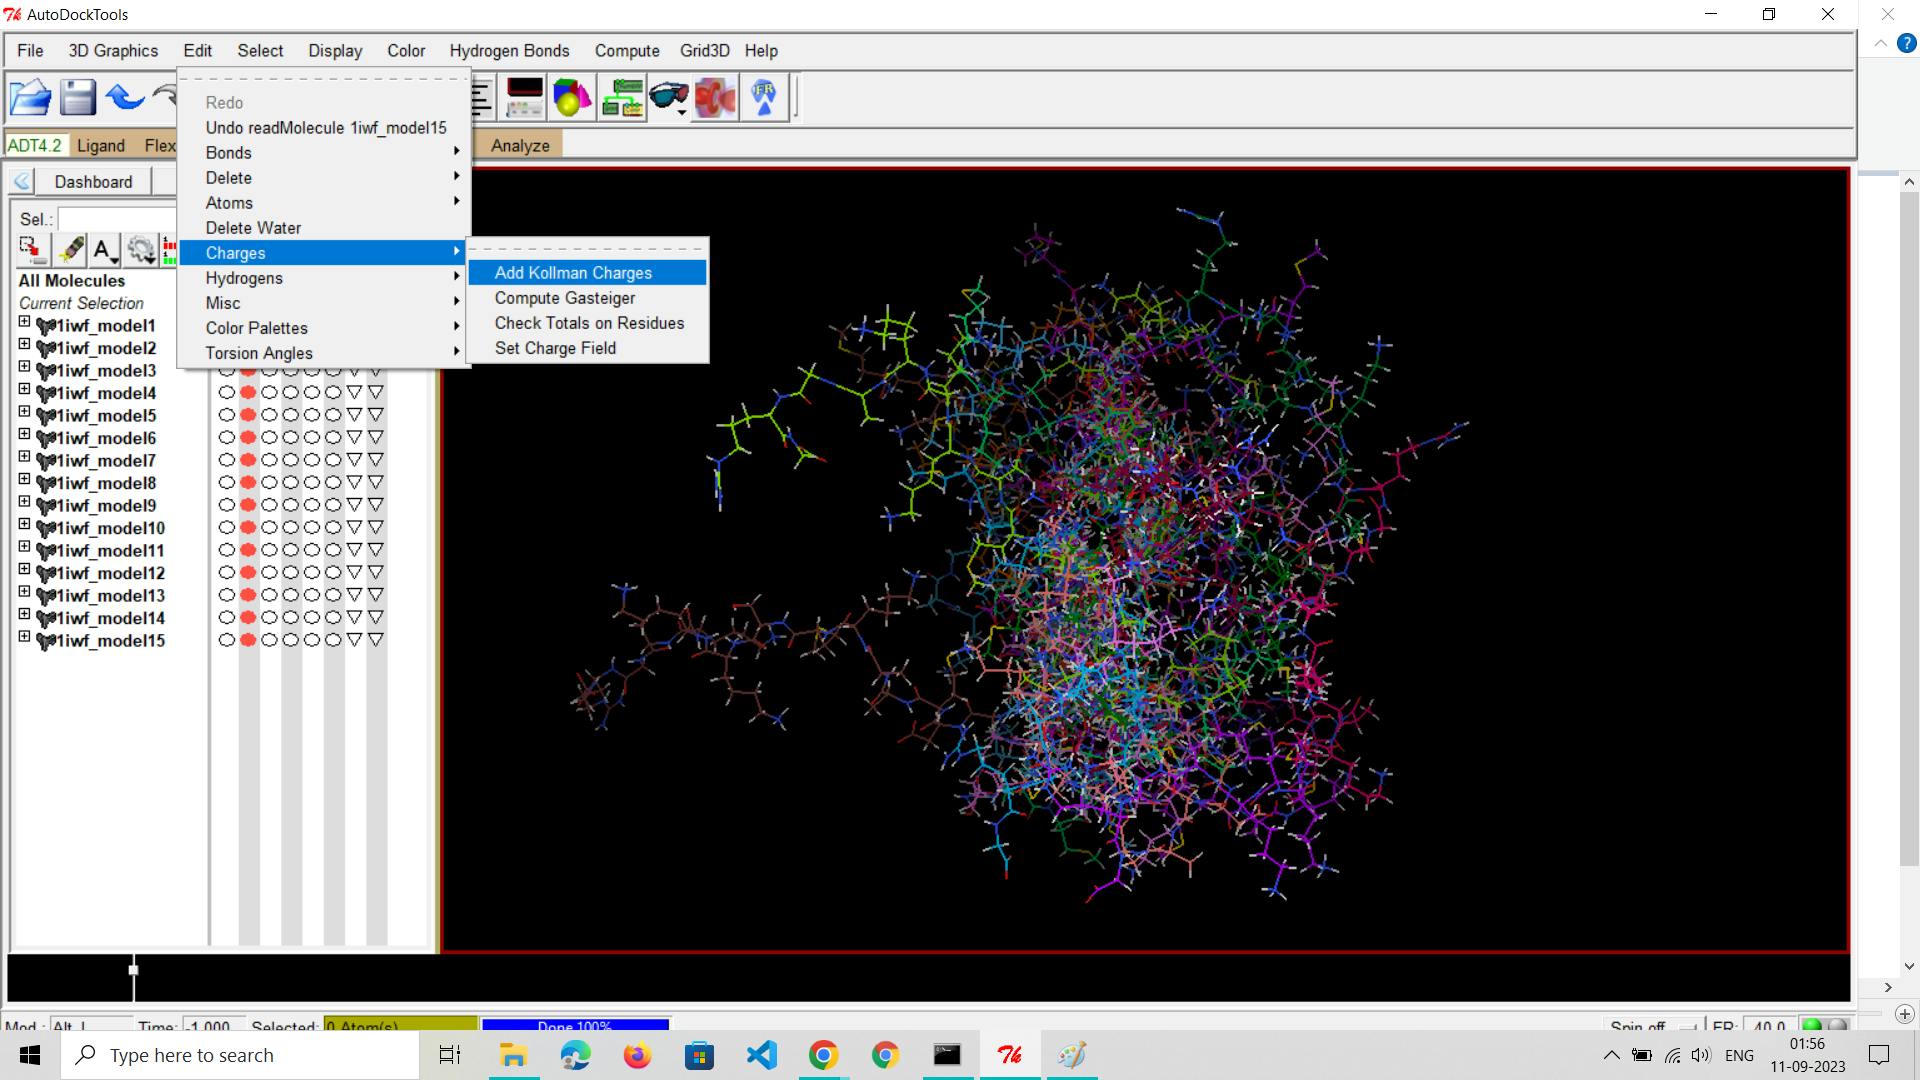
Generate Receptor PDBQT File:
Convert the prepared receptor structure to PDBQT format, including charges and atom types, using Open Babel or a similar tool.
Step 4: Ligand-Receptor Complex Setup (Optional)
Combine Ligand and Receptor (if needed):
If you intend to understand the initial binding mode or perform blind docking, merge the ligand and receptor into a single PDBQT file.
Step 5: Define Grid Box
Set Up Grid Box:
Define the search space (grid box) within your receptor where the docking will take place. This step is crucial for accurate docking.Specify the center coordinates (x, y, z), dimensions (size of the box in each dimension), and grid spacing.Ensure that the grid box encompasses the binding site where you expect the ligand to interact with the receptor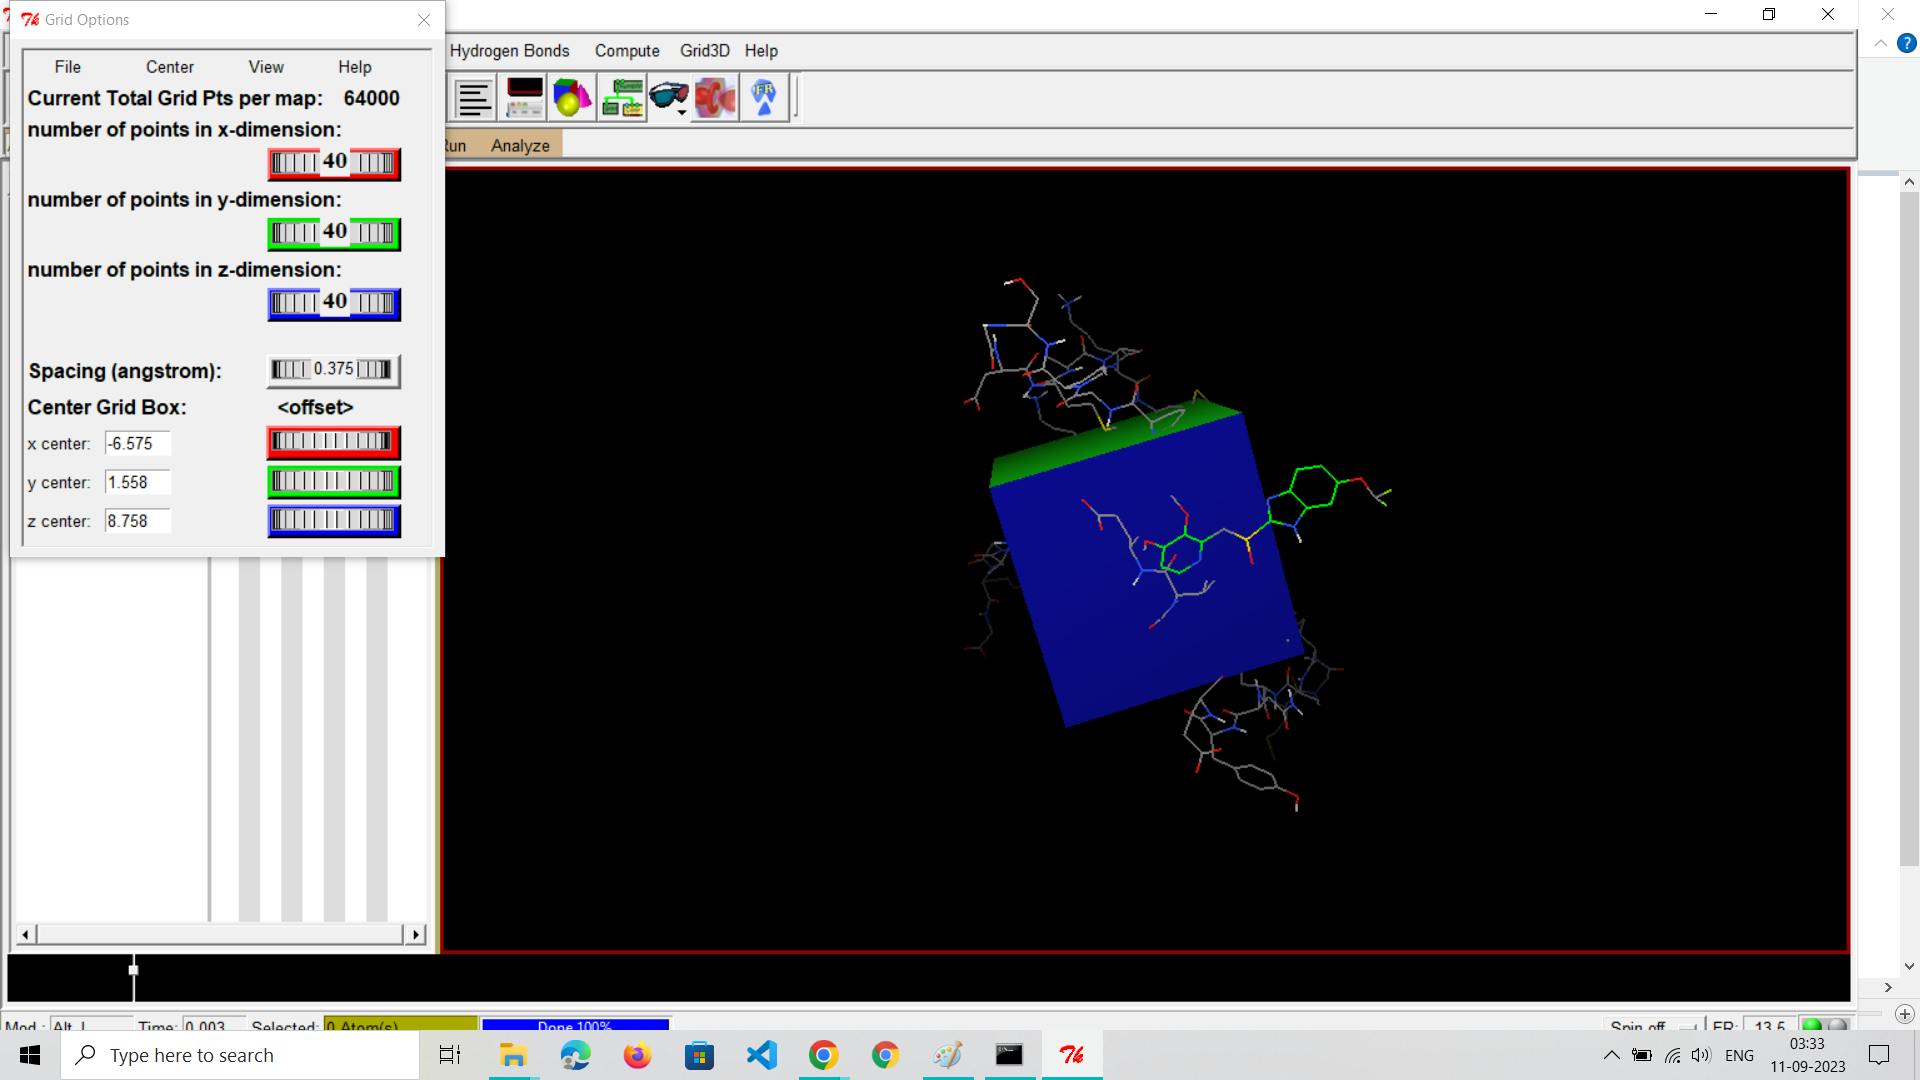
.
Step 6: Prepare Input Files
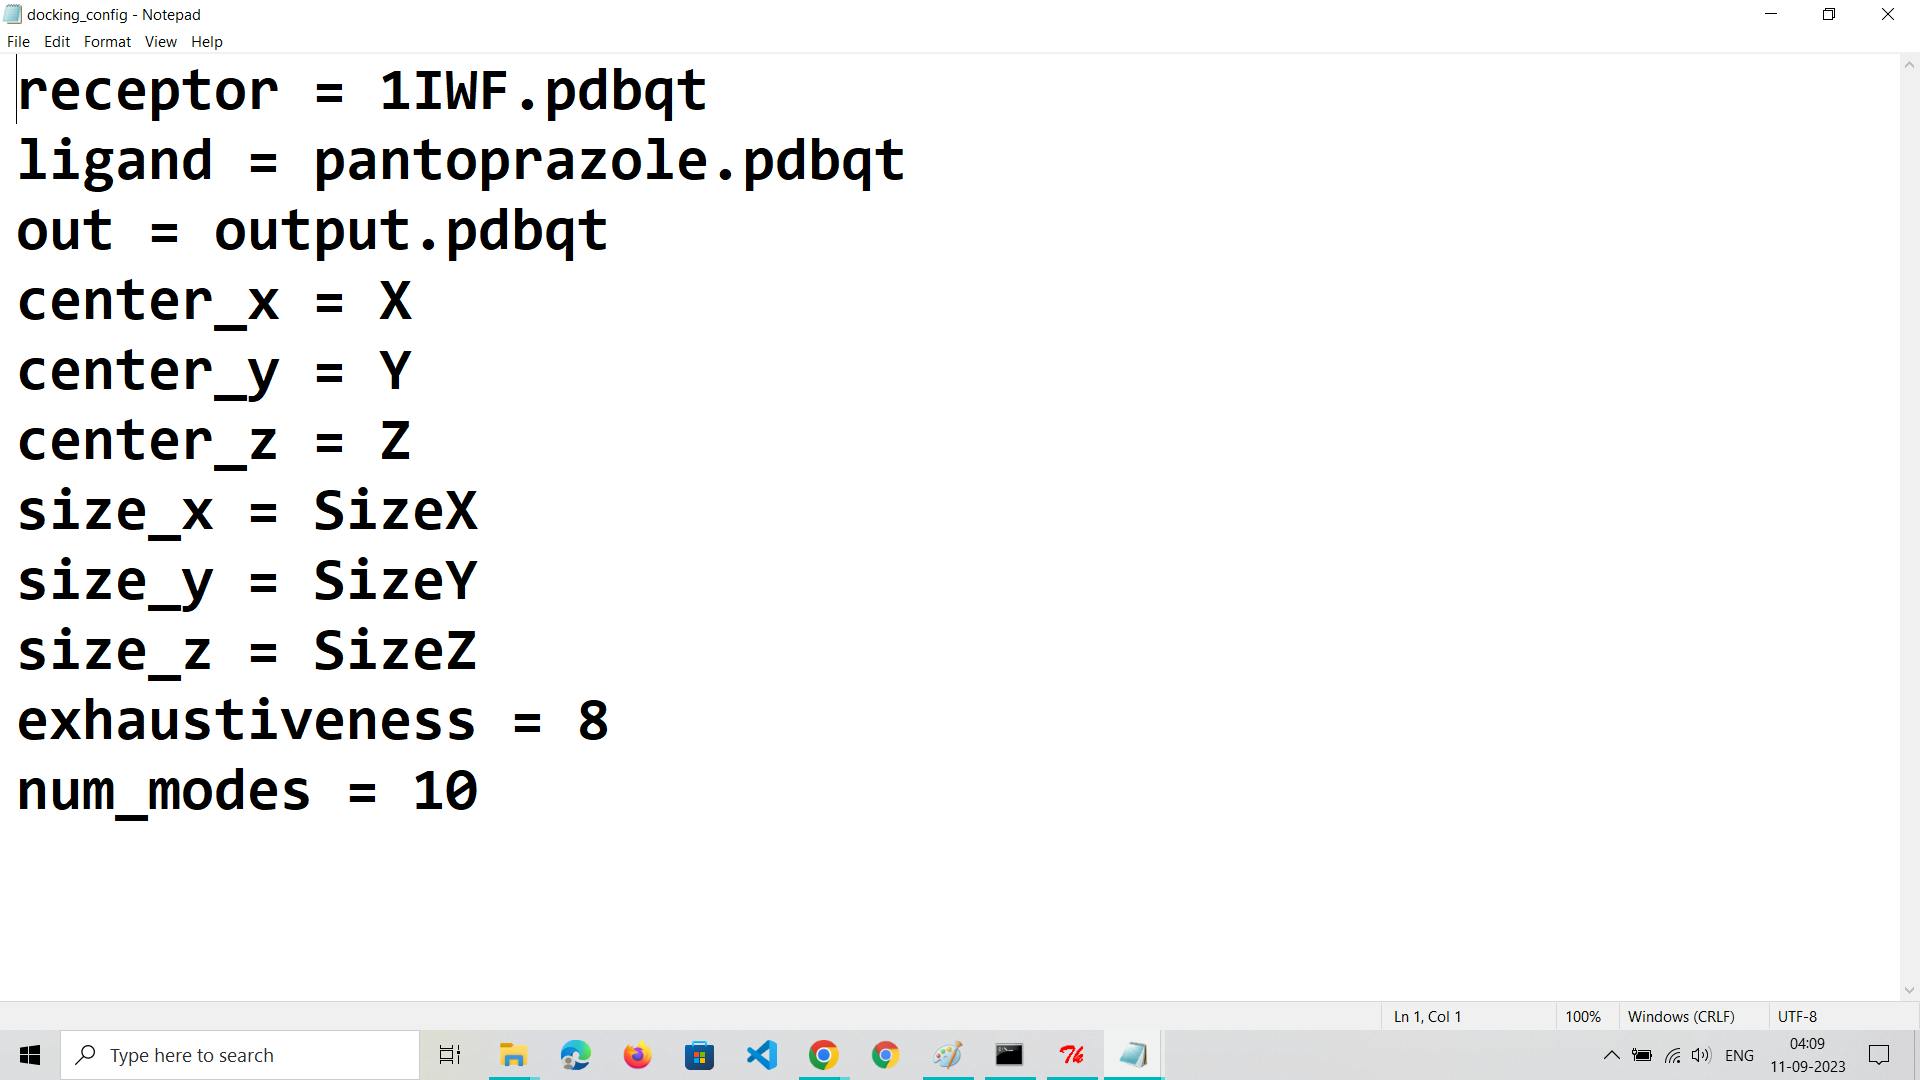
Create a Configuration File:
Develop a text-based configuration file (commonly with a .conf extension) containing parameters for the docking run.Specify details like the ligand file path, receptor file path, grid box parameters, and docking settings.Define parameters such as exhaustiveness (search thoroughness) and the number of output binding poses to generate.
Step 7: Run AutoDock Vina
Run Docking Simulation:
Execute AutoDock Vina from the command line using the configuration file you created. The command typically looks like this:vina --config your_config_file.conf --out your_output_file.pdbqt --log your_log_file.txtAutoDock Vina will perform the docking simulation, exploring different binding poses of the ligand within the defined grid box. The time required depends on your computer's processing power and the complexity of the simulation.
Monitor Progress and Completion:
AutoDock Vina will provide feedback on the progress of the simulation, including updates on the current pose being evaluated.Wait for the simulation to complete; the software will save the results in the specified output file.
Step 8: Analyze Results
Examine Output:
AutoDock Vina generates an output file (usually in PDBQT format) containing the results of the docking simulation.This file includes information about the binding poses, affinity scores (predicted binding energies), and other relevant data.
Visualize Results:
Use molecular visualization software like PyMol, Chimera, or VMD to visualize the docking results.Load the receptor, ligand, and output docking poses to analyze the interaction between the ligand and receptor.
Select Optimal Binding Poses:
Based on affinity scores, distances, and visual inspection, select the binding poses that appear most promising for further analysis or experimental validation.
Step 9: Post-Docking Analysis
Refinement (if needed):
Depending on your research goals, you may perform further refinement of the selected binding poses using techniques like molecular dynamics simulations or energy minimization.
Data Interpretation:
Interpret the docking results to understand the strength of ligand-receptor interactions, binding modes, and potential binding sites.
Step 10: Documentation and Reporting
Document Your Findings:
Thoroughly document all aspects of your docking experiment, including software versions, parameter settings, input files, and results.Proper documentation is essential for reproducibility and future reference.
Report Your Results:
Share your findings through research reports, publications, or presentations.Include details of the docking methodology, results, and the implications of your research.